
Docker Course #1: What is Docker? Installation and Your First Container

Welcome to the Docker Course - Part 1 of 10
![]()
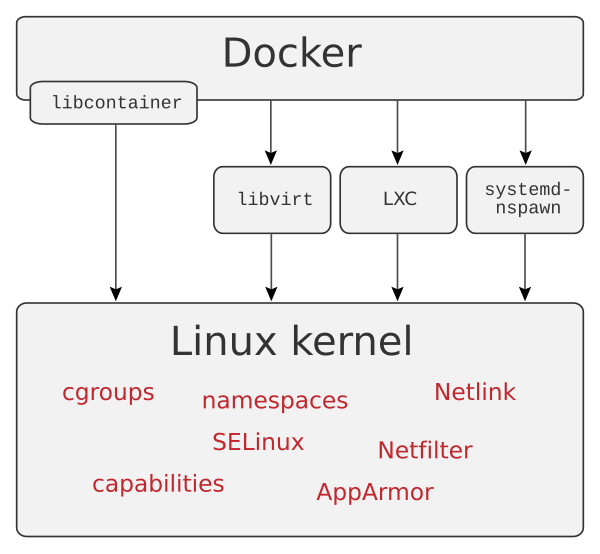
Source: Wikimedia Commons
Welcome to the Docker Course! This is article 1 of 10 in a comprehensive series that will take you from zero to confident Docker user. Whether you are a developer, a sysadmin, or just curious about containerization, this course is for you.
In this first article, we will answer the fundamental question: What is Docker? We will install Docker on your machine, run your very first container, and learn the essential commands that every Docker user needs to know.
What is Docker?
Docker is an open-source containerization platform that allows you to package applications along with all their dependencies into lightweight, portable units called containers. A container includes everything your application needs to run: the code, runtime, system tools, libraries, and settings.
Think of Docker as a way to create a standardized box for your application. No matter where you ship that box — your laptop, a test server, or a cloud provider — the application inside runs exactly the same way.
Docker was first released in 2013 by Solomon Hykes and has since become the industry standard for containerization. It is used by companies like Google, Netflix, Spotify, and millions of developers worldwide.
Why Use Docker?
Before Docker, developers often faced the infamous "it works on my machine" problem. An application that runs perfectly on one computer could fail on another due to differences in operating systems, installed libraries, or configuration.
Docker solves this and many other problems:
- Consistency: Your app runs the same way everywhere — development, staging, and production
- Isolation: Each container is isolated, so applications do not interfere with each other
- Speed: Containers start in seconds, unlike virtual machines that take minutes
- Portability: Move containers between any system that runs Docker
- Efficiency: Containers share the host OS kernel, using far fewer resources than VMs
- Scalability: Easily run multiple instances of your application
- Version control: Track changes to your environment just like you track code changes
Containers vs Virtual Machines
To understand Docker, it helps to compare containers with virtual machines (VMs), the technology that came before.
Virtual Machines
A VM runs a complete operating system on top of a hypervisor (like VMware or VirtualBox). Each VM includes its own kernel, libraries, and applications. This means:
- Each VM can use several GB of disk space
- Boot time is measured in minutes
- Resource overhead is significant (RAM, CPU)
- You can typically run only a few VMs on a single machine
Containers
A container shares the host operating system kernel and only packages the application and its dependencies. This means:
- Containers can be as small as a few MB
- Boot time is measured in seconds
- Resource overhead is minimal
- You can run dozens or hundreds of containers on a single machine
Installing Docker on Windows
Docker Desktop is the recommended way to run Docker on Windows. It includes the Docker Engine, CLI, Docker Compose, and a graphical dashboard.
System Requirements
- Windows 10 64-bit (Build 19041 or later) or Windows 11
- WSL 2 backend enabled (recommended)
- At least 4 GB of RAM
- Hardware virtualization enabled in BIOS
Installation Steps
- Go to Docker Desktop for Windows
- Download the installer (
Docker Desktop Installer.exe) - Run the installer and follow the wizard
- Make sure "Use WSL 2 instead of Hyper-V" is checked
- Click Install and wait for the process to complete
- Restart your computer when prompted
- Open Docker Desktop from the Start menu
wsl --install. Restart your computer, then launch Docker Desktop again.
Installing Docker on macOS
Docker Desktop is also available for macOS and supports both Intel and Apple Silicon (M1/M2/M3) chips.
Installation Steps
- Go to Docker Desktop for Mac
- Download the correct version for your chip (Intel or Apple Silicon)
- Open the
.dmgfile and drag Docker to the Applications folder - Open Docker from the Applications folder
- Accept the license agreement
- Docker Desktop will start and you will see the whale icon in your menu bar
Installing Docker on Linux
On Linux, you install the Docker Engine directly. Here are the steps for Ubuntu/Debian:
1# Update packages and install prerequisites
2sudo apt-get update
3sudo apt-get install -y ca-certificates curl gnupg
4
5# Add Docker's official GPG key
6sudo install -m 0755 -d /etc/apt/keyrings
7curl -fsSL https://download.docker.com/linux/ubuntu/gpg | \
8  sudo gpg --dearmor -o /etc/apt/keyrings/docker.gpg
9sudo chmod a+r /etc/apt/keyrings/docker.gpg
10
11# Add the Docker repository
12echo \
13  "deb [arch=$(dpkg --print-architecture) signed-by=/etc/apt/keyrings/docker.gpg] \
14  https://download.docker.com/linux/ubuntu \
15  $(. /etc/os-release && echo "$VERSION_CODENAME") stable" | \
16  sudo tee /etc/apt/sources.list.d/docker.list > /dev/null
17
18# Install Docker Engine
19sudo apt-get update
20sudo apt-get install -y docker-ce docker-ce-cli containerd.io \
21  docker-buildx-plugin docker-compose-plugin
22
23# Add your user to the docker group (so you don't need sudo)
24sudo usermod -aG docker $USERnewgrp docker in your current session.
Verify Your Installation
No matter which operating system you used, verify that Docker is installed correctly by opening a terminal and running:
1# Check Docker version
2docker --version
3# Expected output: Docker version 27.x.x, build xxxxxxx
4
5# Check more detailed info
6docker info
7
8# Verify Docker Compose is available
9docker compose version
10# Expected output: Docker Compose version v2.x.x
If you see version numbers without errors, Docker is installed and running correctly. If you get a "permission denied" error on Linux, make sure you added your user to the docker group and logged out and back in.
Running Your First Container
Now let's run our very first Docker container! Docker provides a special hello-world image for exactly this purpose.
1# Run the hello-world container
2docker run hello-world
When you run this command, Docker will:
- Look for the
hello-worldimage on your local machine - Not find it (since this is your first time), so it pulls the image from Docker Hub
- Create a new container from that image
- Run the container, which prints a confirmation message
- Exit the container
You should see a message that says "Hello from Docker!" along with an explanation of what just happened. Congratulations — you just ran your first container!
Let's try something more useful. Let's run an Nginx web server:
1# Run Nginx in the background, mapping port 8080 to 80
2docker run -d -p 8080:80 --name my-nginx nginx
3
4# Open your browser and go to http://localhost:8080
5# You should see the Nginx welcome page!
Let's break down the flags:
-d— Run in detached mode (in the background)-p 8080:80— Map port 8080 on your machine to port 80 in the container--name my-nginx— Give the container a friendly namenginx— The image to use
-p 3000:80 would map port 3000 on your host to port 80 in the container.
Essential Docker Commands
Here are the commands you will use every day as a Docker user:
1# List running containers
2docker ps
3
4# List all containers (including stopped ones)
5docker ps -a
6
7# Stop a running container
8docker stop my-nginx
9
10# Start a stopped container
11docker start my-nginx
12
13# Restart a container
14docker restart my-nginx
15
16# Remove a stopped container
17docker rm my-nginx
18
19# Force remove a running container
20docker rm -f my-nginx
21
22# View container logs
23docker logs my-nginx
24
25# Follow logs in real-time
26docker logs -f my-nginx
27
28# Execute a command inside a running container
29docker exec -it my-nginx bash
30
31# Pull an image from Docker Hub
32docker pull ubuntu:22.04
33
34# List downloaded images
35docker images
36
37# Remove an image
38docker rmi nginxdocker rm -f will forcefully stop and remove a container. Make sure you do not need any data inside the container before running this command. We will learn about persistent data in a later article.
Understanding the Docker Workflow
The basic Docker workflow follows these steps:
- Write a Dockerfile that describes your application environment
- Build an image from the Dockerfile
- Push the image to a registry (like Docker Hub)
- Pull the image on any machine
- Run a container from the image
In this first article, we skipped steps 1-3 and used pre-built images from Docker Hub. We will learn how to build our own images starting in article 3.
For more details, check the official Docker Getting Started guide.
Summary
In this first article of the Docker Course, we covered:
- What Docker is and why it has become essential for modern development
- The key differences between containers and virtual machines
- How to install Docker on Windows, macOS, and Linux
- How to verify your installation with
docker --version - Running your first containers: hello-world and Nginx
- The essential Docker commands: run, ps, stop, start, rm, logs, exec
- The overall Docker workflow from Dockerfile to running container
In the next article (Part 2 of 10), we will dive deep into Docker images — how they work, how to explore Docker Hub, and how to manage images on your system. See you there!
Comments
Sign in to leave a comment
No comments yet. Be the first!
Related Articles
Stay updated
Get notified when I publish new articles in English. No spam, unsubscribe anytime.